Discrete Cosine Transform and JPEG compression : Image Processing
JPEG is well-known standard for image compression and Discrete Cosine Transform (DCT) is the mathematical tool used by JPEG for achieving the compression. JPEG is lossy compression meaning some information is lost during the compression. Let’s dig deeper into the JPEG standard starting from the block diagram.
Above diagram shows the encoder part of JPEG. The decoder is the reverse of encoder except it doesn’t contain the reverse part of Quantizer block and this is the main reason why JPEG is lossy compression. We cannot recover data lost during the quantization step. The operations performed by each block is presented below
Compression intuition
Consider numbers ranging from 1,…,99. Suppose it requires 8 bit to store any number from 1 to 99, then it requires 99*8 bits to store all the numbers. Instead of storing all the numbers if we store only the first number i.e. 1 and design a logic as below
number = firstNumber + (index – 1)
Then we can easily retrieve all numbers given the first number. For example to retrieve the 55th element.
55th number = 1 + (55 – 1) = 55
Storing only one number (8 bits) we can retrieve all the 99 numbers (99*8 bits). This results in the compression of 99:1. The numbers I have described so far is ideal. We rarely encounter this type of pattern in real-world examples like images. But this gives some intuition about how compression is achieved in general. Our task is to represent given blocks of numbers (or symbols) with less information that can be retrieved exactly (lossless) or with a small loss (lossy). For image specific domain, I will talk more in DCT block.
Block I: Acquire image and divide it into 8×8 block
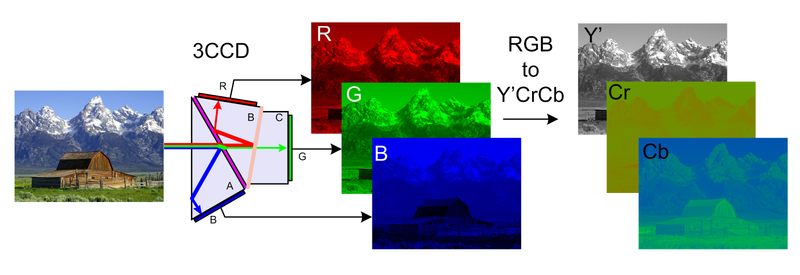
Take an image that you want to compress. The image may be grayscale or color. If the image is color then JPEG standard prefers to convert it into color space known as YCrCb from RGB. These three components are called luminance(Y) and chrominance(Cr and Cb). Luminance basically means “brightness” while chrominance has to do with the difference between a color and a chosen reference color of the same luminous intensity. It is said that eye is less sensitive to fine color details than find brightness details. So after converting into YCrCb color space, you can reduce the resolution of Cr and Cb components. In MATLAB, use rgb2ycrcb command to change the color space. If you want to write your own implementation then here is the formula:
So far we have separated the image into Y, Cr and Cb component. The following picture illustrates this
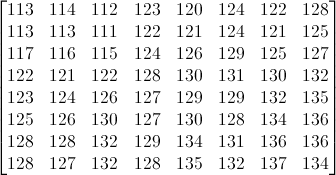
Take a small block of an image (8×8 pixels) from the first component and perform the compression. Take another adjacent block and perform the same operation and do it for all pixels of all components. I have taken the 8×8 block of Y component using MATLAB which is following
The final task of this block is to subtract 128 from each of the pixel value. So final block becomes
\[\begin{bmatrix} -15 & -14 & -16 & -5 & -8 & -4 & -6 & 0 \\ -15 & -15 & -17 & -6 & -7 & -4 & -7 & -3 \\ -11 & -12 & -13 & -4 & -2 & 1 & -3 & -1 \\ -6 & -7 & -6 & 0 & 2 & 3 & 2 & 4 \\ -5 & -4 & -2 & -1 & 1 & 1 & 4 & 7 \\ -3 & -2 & 2 & -1 & 2 & 0 & 6 & 8 \\ -0 & 0 & 4 & 1 & 6 & 3 & 8 & 8 \\ 0 & -1 & 4 & 0 & 7 & 4 & 9 & 6 \end{bmatrix}\]
This 8×8 block is now fed into another block for Forward Discrete Cosine Transform.
Block II: Perform Forward Discrete Cosine Transform
Before starting the mathematical formulation of DCT, let’s see an illustration of how DCT helps to compress.
DCT converts the finite set of image pixels into frequency representation. It means the pixels values are expressed in terms of sum of cosine functions oscillating at different frequencies. If we apply DCT to the first 8 pixels of the image, then we get sum of cosine function oscillating at 8 different frequencies from low to high. The result of the cosine transform of the first row of above 8×8 block using MATLAB’s dct function is given below.
Original pixels
\[\begin{bmatrix} 113 & 114 & 112 & 123 & 120 & 124 & 122 & 128 \end{bmatrix}\]
The 1-D DCT results
\[\begin{bmatrix} 337.99 & -13.72 & -0.92 & -0.40 & 4.24 & -0.16 & -0.38 & -5.70 \end{bmatrix}\]
Look closely at the transformed matrix. The first element is very big relative to other elements. This is the beauty of DCT. DCT gives very high frequency compaction. Most of the frequency is compacted to the first few elements and other elements approach to zeros. You can see the higher frequency components are approaching to zero. Here we can conclude that the original pixels contain very few high frequency components.
What is a frequency in the context of Image?
It’s nothing but variation between the adjacent pixels. Low-frequency image means low variation between the adjacent pixels and high frequency means high variation between adjacent pixels. The above pixels are taken from low-frequency image because the adjacent pixels have less variation.
Lets modify the transformed matrix [more discussion will be on Quantization block] and assign zeros to all elements that are near to zero. The new quantized matrix will be
\[\begin{bmatrix} 337.99 & -13.72 & 0 & 0 & 0 & 0 & 0 & 0 \end{bmatrix}]\]
We need to store 1st component i.e 337.99, 2nd component i.e. -13.72 and six 0s. This is how we achieve the compression using DCT [the actual coding techniques will be discussed in Entropy Encoder block].
Also, the inverse DCT of this matrix results
\[\begin{bmatrix} 113 & 114 & 116 & 118 & 121 & 123 & 125 & 126 \end{bmatrix}\]
Which is very similar to original matrix with high frequency components being ignored. DCT is only suited for low frequency images and fortunately continuous tone digital images typically have little or no high frequency spatial variation.
Now come to the Mathematical definition of DCT. The 1-D DCT can be written as
\[y(\Omega)= \sqrt{\frac{2}{n}}w(\Omega)\sum_{x = 0}^{N-1}f(x)\cos\frac{(2x+1)\pi\Omega}{2N}, \Omega = 0,…,N\]
Where
\[w(\Omega)= \begin{cases} \frac{1}{\sqrt2},& \text{for } \Omega = 0\\ 1, & \text{otherwise} \end{cases}\]
In the first iteration of calculation, the 8 pixels are multiplied by 8 points from first basis vector. Since the basis vector for Omega = 0 acts like low pass filter, it averages all the pixels value and stores the maximum energy with it. In the second iteration, the pixels are multiplied by second basis vector which has a slightly high frequency than the first one [it can be seen clearly in the figure]. The last basis vector has maximum frequency and multiplication of pixels with this vector gives the most high-frequency components.
This above discussion is all about 1-D cosine transform. When talking about the image [which is 2-D], it is advantageous to incorporate a quantitative measure of both vertical and horizontal spatial frequency, not just one or the other. So we perform the 2-D cosine transform in the 8×8 block of the image. The 2-D transform can be obtain by using 1-D transform along row and column due to the separability property of DCT. The formula for 2-D cosine transform is:
\[B_{pq} = \alpha_p\alpha_q\sum_{m=0}^{M-1}\sum_{n=0}^{N-1}A_{mn}\cos\frac{\pi(2m+1)p}{2M}\cos\frac{\pi(2n+1)p}{2N}\]
\[\begin{bmatrix} -15 &-30 &-2 &0 &5 &-1 &0 &0 \\ -38 &-6 &-3 &4 &5 &0 &0 &-11 \\ -6 &0 &0 &0 &0 &0 &0 &0 \\ 0&0 &4 &-6 &0 &0 &0 &0 \\ 4&-1 &0 &0 &0 &0 &0 &0 \\ 5&0 &-1 &0 &0 &0 &0 &0 \\ 0&0 &0 &0 &-1 &0 &0 &0 \\ 0&0 &0 &0 &0 &0 &0 &0 \end{bmatrix}\]
Block III: Quantization
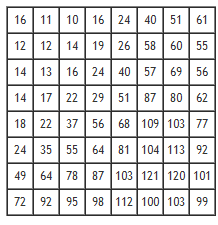
After a block of pixels has been transformed to frequency coefficients, it is quantized. This is the stage of the algorithm when information is discarded. Quantization means that a larger unit step size is selected for each element in the 8×8 block and the sample of the block is forced to the nearest multiple of step size. Mathematically the quantization step is defined as:
\[g_{vu} = N\left(\frac{f_{vu}}{q_{uv}}\right)\]
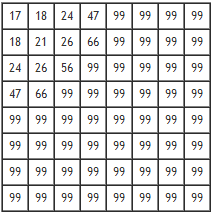
The JPEG standard quantization table is given below:
The 8×8 block of DCT coefficient after quantization becomes
\[\begin{bmatrix} -1& -3& 0& 0& 0& 0& 0& 0\\ -3& -1& 0& 0& 0& 0& 0& 0\\ 0& 0& 0& 0& 0& 0& 0& 0\\ 0& 0& 0& 0& 0& 0& 0& 0\\ 0& 0& 0& 0& 0& 0& 0& 0\\ 0& 0& 0& 0& 0& 0& 0& 0\\ 0& 0& 0& 0& 0& 0& 0& 0\\ 0& 0& 0& 0& 0& 0& 0& 0 \end{bmatrix}\]
Block IV: Entropy Encoder
The above quantized matrix is now coded with the entropy coded techniques. Before Huffman coding, the JPEG standard first align the elements of 8×8 block in Zigzag order as shown in figure below.
The zigzag ordering rearranges the coefficients in one dimensional order, in result most of the zeros will be place at the end of the stream. After zigzag ordering, the quantized block becomes
\[\large \begin{bmatrix} -1& -3& -3& 0& -1& 0& 0& 0& 0& 0 \end{bmatrix}\]
and with long run of 0s [which is not shown].
The real encoding starts after the coefficients are arranged in Zigzag format. Before starting encoding, lets talk about AC and DC coefficients
DC coefficient: The first coefficient of 64 coefficient [8×8 block].
AC coefficients: Rest 63 coefficients of 8×8 block.
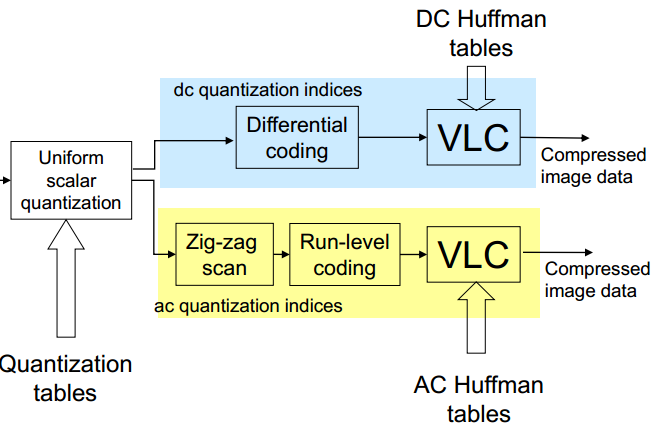
The illustration of encoding process is given in diagram below:
To encode the DC coefficient, first we perform the differential coding. This means the difference of DC coefficients of two consecutive block is coded instead of each DC coefficient. JPEG standard maintains two different Huffman code tables for both DC and AC components.
Note
In this article, since I am taking only one 8×8 block, I will talk only about AC coefficients.
Run Length Encoding
The AC coefficients are first coded with Run Length Encoding (RLE). In RLE, the long run of 0s are coded with shorthand techniques as (Run, Number) format. Here Run is number of zeros followed by Number. For example [14,0,0,-5,0,0,0,2] is coded as (0,14),(2,-5),(3,2). There are few restrictions in this techniques. First of all, the length of a run of zeros can only range from 0 – 15. This means that a run of 38 zeros followed by 5, for example, would be coded (15,0),(15,0),(6,5). This is so that the run length can be stored on a nibble (4bits), which will come in handy later with Huffman coding. Note that with this scheme, (15,0) actually represents a run of 16 zeros, not 15, as it represents a zero preceded by 15 zeros. Also, there is a special marker (0,0), known as the EOB (end of block), that indicates that all of the rest of the coefficients are zero. This is extremely helpful in compression. Applying this RLE, the above 64 zigzag pattern becomes.
[(0,-1),(0,-3),(0,-3),(1,-1),EOB] or [(0,-1),(0,-3),(0,-3).(1,-1),(0,0)]
[Note that I am considering DC coefficient (-1) as AC coefficient for sake of simplicity].
Variable-length Huffman Coding
After zero run-length coding, the coefficients can be compressed further with an extremely clever Huffman coding scheme. First of all, the encoder needs to change its representation of each nonzero coefficient. It groups each value with a “category”, which is a number representing the minimum number of bits needed to store the value. It then associates each encoded category with a bit string of that minimum length. If the bit string starts with a 1, then its ordinary unsigned representation of that bit stream for the coefficient. Otherwise, use the negative of the binary NOT of the bit string. For instance:
13 would be encoded as category 4:1101 -13 would be encoded as category 4:0010
42 would be encoded as category 6:101010 -42 would be category 6: 010101
The coding is now represented in a new format as [(run, size), value]. Our above example becomes
(0,-1) = [(0,1),0] because binary value of -1 is 0 which is of size 1. Similarly
(0,-3) = [(0,2),00]
(0,-3) = [(0,2),00]
(1,-1) = [(1,1),0]
That results
{(0,1),0,(0,2),00,(0,2),00,(1,1),0,(0,0)}
JPEG suggested the look-up table (LUT) for AC components for run/category pair. By looking at that table, the Huffman code for our pair are
(0,1) = 00
(0,2) = 01
(1,1) = 1100
(0,0) = 1010
So the final encoded string of bits is
{000001000100110001010}
Which is of 21 bits whereas the original block of pixel is 64*8 = 512 bits.






Dai I am also computer engineering student and i so wanted to learn about these things ! Encryption,Sound Processing haru ko bare ma ni topic rakhnu na !