Getting Started with Powerful yet Easy Python Graphics Module, Turtle
Introduction
The Logo programming language is frequently linked to turtle graphics. In the late 1960s, Seymour Papert added turtle graphics support to Logo to support his version of the turtle robot, which is a simple robot controlled from the user’s workstation and designed to carry out the drawing functions assigned to it using a small retractable pen set into or attached to the robot’s body.
The standard library of the Python programming language now contains a Turtle graphics module. Turtle in Python, like its Logo ancestor, allows programmers to manipulate one or more turtles in a two-dimensional space.
Overview of the syntax
A location, an orientation (or direction), and a pen are the three qualities of the turtle. Color, width, and on/off state are all properties of the pen (also called down and up).
“Move ahead 10 spaces” and “turn left 90 degrees” are orders that the turtle responds to based on its current location. The turtle’s pen can also be managed by enabling it, changing its color, and adjusting its breadth. By visualizing what they would do if they were the turtle, a pupil may comprehend (and forecast and reason about) the turtle’s motion. This is referred to as “body syntonic” reasoning by Seymour Papert.
Basic syntax:
import turtle // start of the program
     //body
    //of the main
   //code
turtle.done() //end of the program
Installation
Open your command terminal and check weather if you have turtle module, using the following command:
pip listIf turtle isn’t present in the list then use the following command:
pip install turtleNow we’re ready to learn.
Methods
The most frequently, used turtle methods are:
| Method | Parameter | Description |
|---|---|---|
| Turtle() | None | Creates and returns a new turtle object |
| forward() | amount | Moves the turtle forward by the specified amount |
| backward() | amount | Moves the turtle backward by the specified amount |
| right() | angle | Turns the turtle clockwise |
| left() | angle | Turns the turtle counterclockwise |
| penup() | None | Picks up the turtle’s Pen |
| pendown() | None | Puts down the turtle’s Pen |
| up() | None | Picks up the turtle’s Pen |
| down() | None | Puts down the turtle’s Pen |
| color() | Color name | Changes the color of the turtle’s pen |
| fillcolor() | Color name | Changes the color of the turtle will use to fill a polygon |
| heading() | None | Returns the current heading |
| position() | None | Returns the current position |
| goto() | x, y | Move the turtle to position x,y |
| begin_fill() | None | Remember the starting point for a filled polygon |
| end_fill() | None | Close the polygon and fill with the current fill color |
| dot() | None | Leave the dot at the current position |
| stamp() | None | Leaves an impression of a turtle shape at the current location |
| shape() | shapename | Should be ‘arrow’, ‘classic’, ‘turtle’ or ‘circle’ |
Getting Started
While learning it’s always advised to start simple then move slowly but surely to learn more complex things. Today we are going to learn turtle by first drawing a simple line that is bent 45 degrees, a square, coloring the square and finally two squares with and without touching each others.
So open IDE of your choice and lets get coding.
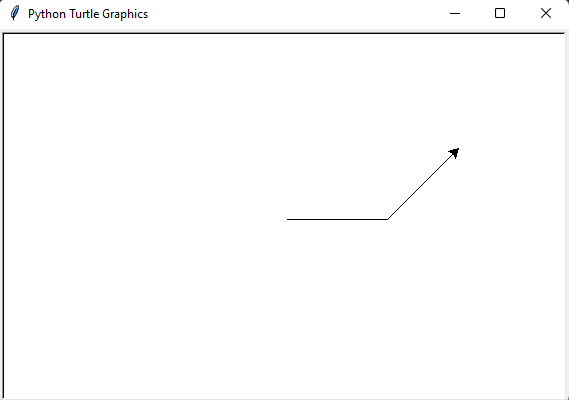
Line with a 45 degree bent
The following is the code for drawing a line with a 45 degree bent:
import turtle
tom = turtle.Turtle()
tom.forward(100)
tom.left(45)
tom.forward(100)
turtle.Screen().exitonclick() // or, turtle.done()
From, above
- We imported the turtle module.
- We initialized our turtle named tom.
- We asked tom to move forward 100 pixels.
- After moving forward 100 pixels we asked tom to turn 45 degrees.
- Then tom is asked to move forward 100 pixels.
Upon running the program you might observe your turtle graphics screen opening briefly and then terminating upon the program is complete. Inorder to let the screen hold we add “turtle.Screen().exitonclick() or turtle.done()” at the end of our code.
Output
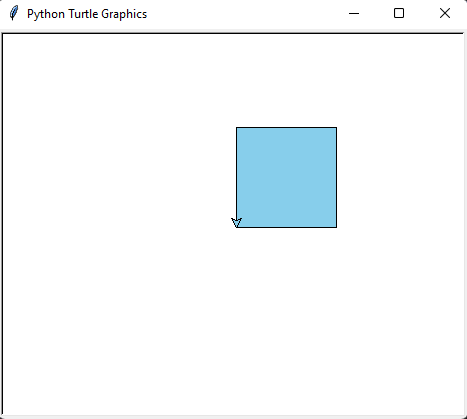
Square
The following is the code for drawing a square in turtle:
import turtle
tom = turtle.Turtle()
tom.forward(100)
tom.left(90)
tom.forward(100)
tom.left(90)
tom.forward(100)
tom.left(90)
tom.forward(100)
turtle.Screen().exitonclick()
From, above
- We imported the turtle module.
- We initialized our turtle named tom.
- We asked tom to move forward 100 pixels.
- After moving forward 100 pixels we asked tom to turn 90 degrees.
- We repeated the above two steps twice.
- We again asked tom to move forward 100 pixels.
- Finally we added the exitonclick() method
Output

Coloring the Square
The following is the code for drawing a square and coloring it in turtle:
import turtle
tom = turtle.Turtle()
tom.begin_fill()
tom.color("black", "sky blue")
tom.forward(100)
tom.left(90)
tom.forward(100)
tom.left(90)
tom.forward(100)
tom.left(90)
tom.forward(100)
tom.end_fill()
turtle.Screen().exitonclick()
From above code, we can see that we basically added three lines of code. They are:
- tom.begin_fill() / tom.end_fill(): The .begin_fill() and .end_fill() do as the name suggests.
- tom.color(“black”, “sky blue”): Here, .color() function takes two colors (black and sky blue) as .color(“border_color”, “fill_color”). Where from the output given below we can observe black border and the sky blue fill.
**Note** we can reduce the lines of code using loops but this blog is targeted towards people who have never done python and beginners at most.
Output
Making multiple Squares(Attached)
The following is the code for drawing multiple squares and coloring it in turtle:
import turtle
tom = turtle.Turtle()
tom.begin_fill()
tom.color("black", "sky blue")
tom.forward(100)
tom.left(90)
tom.forward(100)
tom.left(90)
tom.forward(100)
tom.left(90)
tom.forward(100)
tom.end_fill()
tom.begin_fill()
tom.color("red", "pink")
tom.forward(100)
tom.left(90)
tom.forward(100)
tom.left(90)
tom.forward(100)
tom.left(90)
tom.forward(100)
tom.end_fill()
tom.begin_fill()
tom.color("violet", "yellow")
tom.forward(100)
tom.left(90)
tom.forward(100)
tom.left(90)
tom.forward(100)
tom.left(90)
tom.forward(100)
tom.end_fill()
tom.begin_fill()
tom.color("brown", "light green")
tom.forward(100)
tom.left(90)
tom.forward(100)
tom.left(90)
tom.forward(100)
tom.left(90)
tom.forward(100)
tom.end_fill()
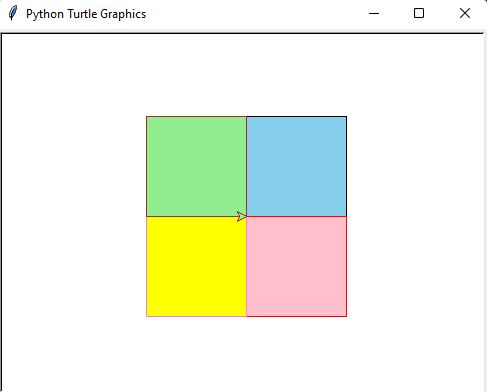
turtle.Screen().exitonclick()From above, we can see we basically copy and paste the same square code three times with different border and fill colors.
Output
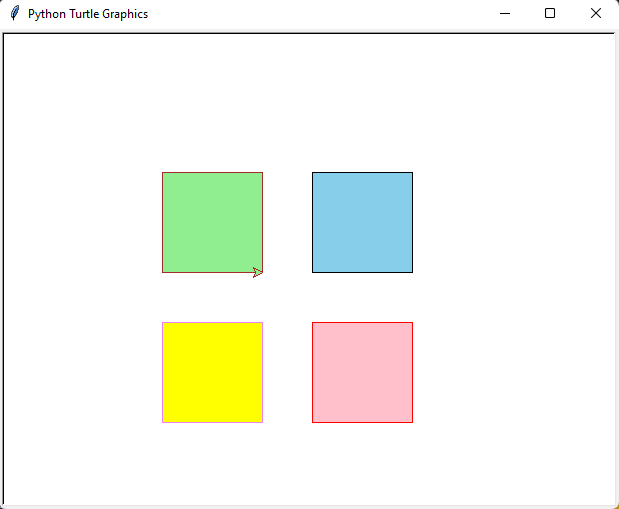
Making multiple Squares(Separate)
The following is the code for drawing multiple(separate) squares and coloring it in turtle:
import turtle
tom = turtle.Turtle()
tom.begin_fill()
tom.color("black", "sky blue")
tom.forward(100)
tom.left(90)
tom.forward(100)
tom.left(90)
tom.forward(100)
tom.left(90)
tom.forward(100)
tom.end_fill()

tom.penup()
tom.forward(50)
tom.pendown()

tom.begin_fill()
tom.color("red", "pink")
tom.forward(100)
tom.left(90)
tom.forward(100)
tom.left(90)
tom.forward(100)
tom.left(90)
tom.forward(100)
tom.end_fill()

tom.penup()
tom.forward(50)
tom.pendown()

tom.begin_fill()
tom.color("violet", "yellow")
tom.forward(100)
tom.left(90)
tom.forward(100)
tom.left(90)
tom.forward(100)
tom.left(90)
tom.forward(100)
tom.end_fill()

tom.penup()
tom.forward(50)
tom.pendown()

tom.begin_fill()
tom.color("brown", "light green")
tom.forward(100)
tom.left(90)
tom.forward(100)
tom.left(90)
tom.forward(100)
tom.left(90)
tom.forward(100)
tom.end_fill()
turtle.Screen().exitonclick()
From above code, we can see that we basically added three lines of code, three times. They are:
- tom.penup() / tom.pendown(): Here, .penup() function signifies to raise the pen(as in our drawing cursor). And .pendown() method signifies to rest the pen(as in our drawing cursor). And in between them we have .forward() method.
- tom.forward(50): From the first example itself we know what .forward() method does. Here, as the cursor(.penup()) is raised tom the turtle moves 50 pixels forward and then the cursor is put down(.pendown()).
Output